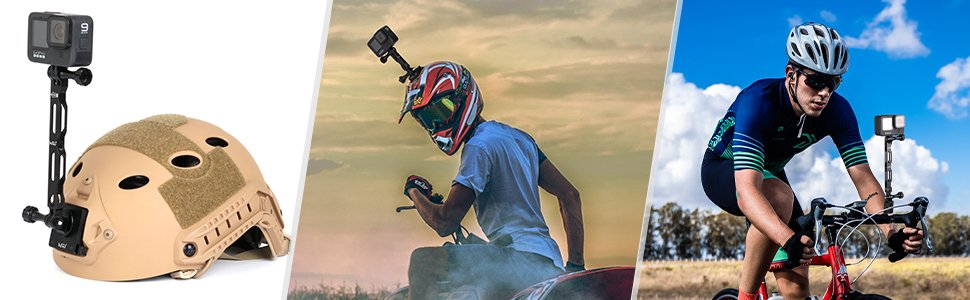
A helmet-mounted GoPro sitting flush against your head captures a narrower, more cramped angle than most riders expect — often cutting off the horizon, or putting too much helmet and not enough action in frame. The fix isn’t a different mount; it’s distance. An extension arm pushes the camera up and away from the mounting surface, opening up the angle and giving you the kind of shot that actually looks like the footage you see in edited highlight reels.
At HSU we design and machine mounting hardware for GoPro, Osmo Action, and other action camera systems, and extension arms are one of the accessories where the difference between a good version and a weak one shows up almost immediately — usually in the form of wobble at speed. This guide covers how extension arms work, why material and connection design matter more than most buyers expect, and what to look for, using our own Aluminum Alloy Extension Arm Kit as a reference for what a well-built kit typically includes.
What an Extension Arm Actually Does
An extension arm is a rigid segment that sits between your mount (helmet, handlebar, chest strap) and your camera, physically increasing the distance between the two. That distance changes your footage in a few specific ways:
- Wider, more natural framing. Pushing the camera off a helmet or chest strap by even a few inches noticeably reduces how much of the mount itself appears in frame, and opens up the field of view.
- Reduced obstruction from body or gear. On a chest mount especially, an arm can lift the camera above bulky jackets, backpack straps, or life vests that would otherwise creep into the bottom of the frame.
- More flexible angle control. Multiple arm segments, often at different lengths, let you combine them to fine-tune both distance and angle — useful when a single fixed-length arm doesn’t get you exactly where you want the camera.
Why Material and Connection Design Matter More Than People Expect
Not all extension arms perform the same way once you’re actually moving — this is where cheap plastic arms tend to fail visibly.
- Aluminum alloy resists flex under wind and vibration. At speed — cycling, motorcycling, skiing — wind resistance pushes against anything mounted away from the body. A flexible plastic arm will visibly wobble in footage; a rigid aluminum arm holds its position, which is the single biggest difference between smooth and shaky extension-arm footage.
- A hollow design reduces wind resistance without sacrificing rigidity. Rather than a solid metal rod, a hollow-core aluminum arm cuts down on the surface area wind pushes against, while aluminum’s inherent stiffness keeps the arm from flexing the way a thinner solid rod might.
- The connection points matter as much as the arm itself. A three-layer connection design at each joint — where one arm segment locks into the next — is what keeps the whole assembly rigid rather than introducing play at every connection point. A kit with weak or single-layer joints can feel stable when static but develop noticeable wobble once you’re actually moving.
- Corrosion resistance matters for repeated outdoor use. Aluminum alloy resists rust in a way that lower-grade metal or metal-plastic hybrid arms don’t, which matters if the kit is regularly exposed to rain, sweat, or salt air.
Common Configurations and What They’re Used For
Extension arm kits are typically sold with multiple segment lengths so you can mix and match for different setups:
| Configuration | Typical Use |
|---|---|
| Short arm only (roughly 3″) | Subtle distance increase from a helmet mount without changing the angle much |
| Medium arm (roughly 5-6″) | Chest mount setups, clearing bulky jackets or gear |
| Long arm or stacked arms (roughly 8-12″) | Selfie-stick-style setups, pole mounts, wider establishing shots |
| Multiple arms combined | Custom angle and distance combinations — useful for helmet mounts where you want the camera angled slightly forward and up |
A kit built with standard 1/4″ and 3/8″ screw threads at each connection point adds flexibility here too, since it lets you attach other accessories (lights, microphones, secondary mounts) at the same connection points rather than being limited to a single camera mount.
Activities Where Extension Arms Make the Biggest Difference
- Motorcycling and cycling: helmet-mounted extension arms open up framing that a flush mount can’t achieve, and a rigid aluminum arm is what keeps that shot stable at highway speed rather than blurring from vibration.
- Skiing and snowboarding: similar benefit to riding — wind resistance at speed is the main stress test for arm rigidity, and a hollow aluminum design handles this better than a solid or plastic alternative.
- Skateboarding: shorter arm segments help clear a helmet’s shape without adding excessive weight or leverage that could shift balance.
- Chest-mounted hiking or running footage: a medium-length arm lifts the camera clear of jacket collars, backpack straps, or hydration packs that would otherwise partially block the frame.
- Improvised selfie-stick or pole setups: several arm segments can be combined end-to-end (using the same 1/4″ threading) to build a longer reach when a dedicated pole isn’t on hand.
How to Choose the Right Arm Length and Setup
- Start with your mount type. Helmet mounts generally need shorter arms than chest or pole setups, since too much distance on a helmet mount can create excessive leverage and torque during impact-prone activities.
- Consider what’s obstructing your current frame. If a jacket collar or backpack strap is creeping into your shots, a medium-length arm usually solves it without needing the longest option in the kit.
- Combine shorter arms rather than jumping straight to the longest one. Two shorter arms at a slight angle to each other often produce a more useful framing adjustment than one long, straight arm — this is where having multiple lengths in a kit pays off.
- Match arm rigidity to your activity’s speed. Higher-speed activities (motorcycling, downhill skiing) put more stress on arm rigidity than slower ones (hiking, casual cycling) — this is where aluminum’s advantage over plastic is most noticeable.
Frequently Asked Questions
Do extension arms make the camera more likely to hit something during a fall?
It’s a real trade-off worth considering — more distance from the mount means slightly more leverage in an impact. For high-impact activities, many riders favor a shorter arm setup that still improves framing without adding excessive extension. This is a reasonable safety consideration to weigh against the framing benefit for your specific activity.
Can I use multiple extension arms together, or should I only use one at a time?
Kits with standard 1/4″ threading are generally designed to be combined — stacking two or three shorter arms is a common way to fine-tune both distance and angle without needing a single long, rigid arm that might be harder to store or transport.
Will an aluminum extension arm add noticeable weight to my helmet mount?
Aluminum alloy kits are generally designed to be lightweight relative to their rigidity — a hollow-core design specifically helps keep weight down while still resisting flex, which matters for helmet mounts where added weight affects comfort over a long session.
Are these arms compatible with cameras other than GoPro?
Most aluminum extension arm kits use the standard action-camera mount interface, which is compatible with GoPro, DJI Osmo Action, and many Insta360 and other action camera models. Always check the specific compatibility list for your camera generation before buying, since older or newer models occasionally use a different mount standard.
Final Thoughts
An extension arm is a small, unglamorous piece of hardware, but it solves a real framing problem that a lot of riders and creators don’t realize is fixable until they see the difference side by side. The part that separates a good kit from a frustrating one isn’t the concept — it’s the execution: rigid aluminum construction, a hollow design that manages wind resistance, and solid multi-layer connections at every joint. Get those details right, and the arm essentially disappears from the experience — you just get the wider, steadier shot you were after.
About the author: This guide is written and maintained by HSU’s product team, who design and machine mounting hardware for GoPro, DJI Osmo Action, and other action camera systems. Material and durability notes are based on hands-on product testing and are updated as camera generations and mounting standards evolve.